Search This Blog

Saturday, October 16, 2021

Old Trunk

Quick Makeover

This is such a simple little makeover using a small wooden trunk from Hobby Lobby.
Remove hardware.  Paint chest with acrylic of your choice (usually a couple of coats).
Take  1/4" strips of thin cork and color with an alcohol pen (like Copic).
Glue strips to the trunk and then re-adhere hardware.  Lining optional!
Great for Christmas or Victorian rooms.
Always, J


Thursday, October 7, 2021


Tea Tray Tutorial

June 18, 2021 


This sweet Tea Tray is easy to create and can be made with a minimum of items, most of which you probably already have on hand.


1. A small wooden tray (Hobby Lobby or Craft Store)
2. Two long beads suitable for handles
3. Paint and "Accent Paint" here I used gold.
4. White acrylic paint for  "aging"
5. Printed picture for tray bottom. Be sure to spray with clear after printing.
6. Glue  (Either wood glue/hot/white)
7. Toothpicks

Paint tray completely.  Rough edges with emery board and sponge lightly with distress ink.


 Cut the picture to size.  Using glue or ModPodge, glue pic to the inside of the tray.

Using a toothpick, highlight edges with accent color (gold).

After all the paint is dry, coat with a layer of ModPodg for a  glossy look.


The combinations are endless.

And there you go, one Tea/Breakfast Tray.

Enjoy!  J

 Fabric Pumpkins

I have been making these tiny fabric pumpkins for years.  They require minimal sewing experience.  Thank goodness.

Materials needed are fabric 1 1/2" x 3 1/2", upholstery thread, stuffing, green wire 25 gauge, leaves (leaf ribbon from Hobby Lobby shown), embroidery floss to accent fabric, toothpick, and twig (from yard).
Fold fabric right sides together and small stitch across.  Do not cut thread.
Stitch a couple of "lock" stitches and then continue around single edge of fabric.
Pull your thread up tight and make a couple of "lock" stitches.  Cut thread.
Turn "bag" inside out and make a running stitch along the edge.
Stuff, I used poly stuffing and begin to pull running stitch tight.
Once you have secured the opening well, cut thread.  Thread your larger eye needle with emboidery floss and knot.  Push needle from "top" through to bottom.
Start to section.  Continue to place needle from top to center bottom going around the outside of the pumpkin six times.

When sections are complete, sew a couple of stitches to secure floss in top of pumpkin. 
Ready for leaves, stem and wire curlies.

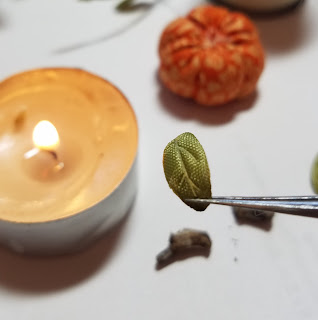
To give your leaf more realism, heat it slowly over a flame.  Be careful!  These can burn up in a poof of smoke.
Next, take your wire and wrap it 5 times around a toothpick.  Cut.
Cut a piece of your yard treasure (tree stem) about 1/4" long.
With a tiny bit of hot glue, affix leaves, stem and wires to pumpkin.
That's all there is to it.  Have fun!  J
PS  These are great done in shabby chic fabric and velvets.